![]() Phone: 605-554-1911 | Email : sales@primalrights.com
Phone: 605-554-1911 | Email : sales@primalrights.com
![]()
Understanding Pressure
Jul 19, 2016
Written By - Greg Dykstra
© Copyright 2009 - Present - Primal Rights Inc
ALL RIGHTS RESERVED
No part of this website or any of its content may be reproduced, distributed, or transmitted in any form or by any means without the express prior written permission of Primal Rights, Inc
Reading pressure is a required skill that all shooters must have.
Whether you are shooting factory ammunition or your own handloads, you absolutely must be able to detect and interpret pressure signs on your fired brass. Rifles can encounter pressure problems for a wide number of reasons. Excessive fouling, extremely hot environmental conditions, uniformity problems with components, lubrication finding its way into your chamber, or even a surprise rain storm can all lead to a condition which will produce unsafe pressures. When these pressure spikes occur, severe damage to your firearm may result. This can lead to serious injury or even be fatal. As a responsible shooter you must understand the conditions that can cause unsafe pressure. If you understand some of the most common causes, then you will be better equipped to avoid them before they become dangerous to you or others around you. In this article we will discuss the causes of pressure, as well as how to read that pressure on our fired brass. We will go into detail on what those pressure signs look like with some high resolution photo's that spare no bandwidth!
First, we will talk about the role of brass during a firing event.
The primary roles of the brass are to hold the components of a cartridge together and to contain the pressure inside the chamber for release out the muzzle. Without brass, it would not be possible to contain the force of the small explosion inside the action of the rifle. The two components that are most important to keeping this pressure from bleeding back into the chamber are the brass, and the primer. The brass casings used in firearms can be thought of as a balloon. When the powder is ignited by the primer, the burning powder expends gas which in turn creates the pressure required to launch the bullet through the bore. That pressure causes the brass to expand to the dimensions of the chamber and essentially "plug" the rear of the chamber, giving only one way for the pressure to escape; out the muzzle. The primer has a role in this as well, due to the fact our cartridges must have an ignition source, and this is accomplished via the flash hole inside the primer pocket of the brass. This means that pressure inside the brass is also transferred through the flash hole onto the primer cup. Thus, signs of excess pressure can be seen on both the brass and the primer. Obviously the complexities of interior ballistics go far beyond the scope of this article. Suffice it to say that there are entire libraries of books which one can read to better understand what is happening in a rifle chamber. One such book is Interior Ballistics; How a Gun Converts Chemical Energy into Projectile Motion, by E.D. Lowry. For the purposes of this article, it is sufficient to say that the brass and primer keep the pressure contained inside the chamber, rather than bleeding out past the bolt nose and through the bolt itself.
A rifle completely destroyed upon firing due to metallurgical problems in the rifle or an over-pressure round.
Image source: http://www.thegunzone.com
Predictable Pressure Causes
Excess pressure can be caused by a great many things. Some of these things we have control over, while others we must simply be mindful of. We will cover many of these conditions here, in no particular order.
Temperature
Smokeless Powder, the substance we use for propellant in firearms, is a high-energy substance that is continually breaking down from the moment it is manufactured. The longer period of time that passes, the less stable it becomes. Heat, can greatly increase the rate of deterioration. Consequently, heat also increases the energy released by the powder if it is ignited. A cartridge that is fired at 10 degrees Fahrenheit will almost always produce less pressure, and thereby a slower muzzle velocity than a cartridge fired at 100 degrees. You may have heard the term "temperature sensitive" used to describe certain powders. This pressure swing as a result of temperature at the time of ignition is what that term describes. Powders that are temperature sensitive will have a very large increase in pressure/velocity from cold to hot, while powders that are not temperature sensitive will have a much smaller increase in pressure as temperature increases. If you are running ammunition that is somewhat "hot" on a cold day, you may find that it will be completely unsafe on a warm day.
Direct Sunlight
The sun gives off radiation which heats things up. This is hopefully obvious to everyone reading this, but it is always surprising to me how many shooters lack an understanding of this simple concept as it relates to their shooting. If you leave your cartridges in direct sunlight, they will get heated up. The paragraph prior to this explains the significance of this. If you leave your rounds in direct sunlight, the temperature inside the cases will rise dramatically. This is evidenced by what you will feel if you rest your hand on a car hood that has been sitting out in direct sunlight in the middle of summer. Most likely you will burn your hand. Metal absorbs a great deal of heat and metal in direct sunlight can get extremely hot quite quickly. Rounds left in direct sunlight can go from a mild and safe load to extremely dangerous in short order. At the very least, rounds left in direct sunlight will almost always impact a distant target higher than those in the shade. The exact amount of impact change or pressure change you will experience will vary depending upon the conditions, components used, and firing cadence. While you might get away with shooting those hot rounds in a cold rifle, that may not be so in a rifle that has just been through a heavy round count and has not cooled.
Water
Wet ammunition is a very common cause of over-pressure. Rain storms, water splashed while running, condensation, and many other things can cause wet ammunition. This is a problem for two main reasons: The first is that water is not very compressible. Contrary to popular belief, it can be compressed, but it has a very high resistance to compression. What this means is that when water is put under extreme pressure the volume of space it occupies will not be reduced significantly. This is important to us because if water gets on our rounds, and those rounds go into the chamber wet, then water will be occupying space in the chamber. When the cartridge is fired, that water can not be easily compressed, and effectively reduces the size of our chamber directly proportionately to the water volume. That reduced size results in less space for the pressure created by burning powder to occupy, thereby increasing pressure. The second reason water being on our ammo is a problem is friction, or described more appropriately, a lack thereof. Water is slippery. One of the core functions of the brass is to expand and grab hold of the chamber walls, spreading the pressure across the entire area of the brass against the chamber. If the brass is not allowed to grab hold of the chamber walls, then all of that pressure is transferred rearward onto the base of the case, the bolt face, and subsequently the bolt lugs and action. If water is in between the brass and the chamber walls, even very light and mildly loaded ammunition will cause severe pressure signs. The ability of the brass to grab onto the chamber walls is paramount to the proper functionality of the firearm.
Cleaning Solvents & Lubricants
Recently we received a rifle back from a customer whom was experiencing chronic pressure over-pressure. The issue was taking place regardless of ammunition used. While we expended a lot of effort to determine the issue over the phone, but could not lock down a cause. I instructed the customer to send the rifle back to us for evaluation. The problem was immediately apparent upon unpacking the rifle. It was dripping in lubricant. The bolt, trigger, bolt raceways, barrel, etc. All were completely covered in oil. This may not bother a semi-auto such as an AR15 in some situations, but it can be extremely dangerous on a bolt action. The reason for this is expressed in the previous paragraph. What is not always immediately apparent is how the transfer of cleaning solvents and lubricants make their way into the chamber. The most obvious sources are the bolt, magazine, and feed ramp. An oiled bolt will tend to transfer that oil to the next round in the magazine. When the bolt is cycled forward, it makes contact with the next round in the magazine along nearly its entire length. If there is a lubricant on the bolt, it will smear that lubricant down the cartridge. When that cartridge is cycled into the chamber, and fired, that lubricant will spread around and coat nearly the entire chamber. The subsequent round after will also be lubricated by the bolt, and be inserted into a chamber completely coated in lubricant by the previous round. Water is quite slick, but lubricants are very much more so! This will almost always result in extreme pressure being transferred to the base of the case and through the action. This particular customer mentioned above did this enough to where you could actually see the words "Hornady 6.5 Creedmoor" imprinted on his bolt face, and the bolt face was permanently damaged due to blown primers. The blame for this could easily be laid on the ammo manufacturer if one were not aware of this lubrication issue. On a bolt rifle, lightly greasing the bolt lugs and other contact points that never come into contact with the ammunition is advised rather than using oil.
Cleaning solvents are also a prime cause for this kind of issue. When cleaning the bore of a rifle, many shooters do not use a bore guide that seals the chamber. This allows cleaning solvents to drip down the back of the chamber onto the barrel tenon/action joint as well as the front action screw. It's amazing just how that solvent can crawl around from there. It's not a good idea to expose bedding to solvents either. Make sure you control the flow of cleaning solvents when servicing your rifle.
As mentioned above in the section on water as well as this section about solvents and lubricants, if the brass is not allowed to grip the chamber walls properly, all of that pressure will be transferred to the bolt face. This can produce a "false positive" of sorts. You may be led to believe that your ammo or load is too hot, when in actuality it is simply a maintenance issue that is causing the problem.
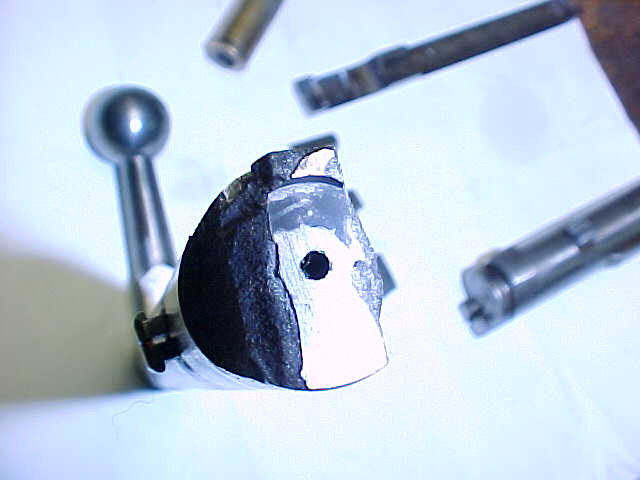
Bolt lugs sheared off.
Image source: Google images
Bolt Thrust
In two paragraphs above regarding water, cleaning solvents, and lubricants, we discussed three different things that interrupted the ability of the brass to grip the chamber wall. The force applied to the bolt face is typically referred to as bolt thrust. Bolt thrust is present even if the pressure is within tolerance and all aspects of the cartridge are performing as they should. It is noteworthy here that the function of the bolt lugs is to keep the bolt face secured firmly in place at a set distance behind the chamber. If the bolt thrust is high enough, the bolt lugs can shear off entirely. This is one of the most dangerous firearm failures due to the simple fact that if the bolt lugs are gone, there isn't much to stop the bolt from traveling rearward out the back of the action. Waiting right there, is your face, or your shoulder, depending on how the firearm you are using is designed. It is a given that there are hundreds of different action designs and many of those designs have other things in place that may stop the bolt from flying out the rear of the firearm. However the point to take away from this is that you can create bolt thrust beyond the tolerance of the components of the firearm if you impede the brass from performing its job. Notice the above image of a bolt without any lugs, representing one of the worst kinds of firearm failures.
Component Quality
Component quality has a great impact on the pressure you will be seeing in your rifle. The causes for over-pressure listed above are quite self evident and can be avoided quite easily if understood. Component quality on the other hand can be much harder to anticipate. Lot to lot variance on any component can lead to over-pressure. A lot number of primers being considerably hotter than a previous lot can cause higher pressures. Same for powder. A lot number of brass being thicker, thereby reducing internal volume, can increase pressure. A lot number of bullets being larger in diameter or having significantly longer bearing surface, can increase pressure. Some brass may be virtually identical regarding its dimensions to the previous lot number, but be comprised of a softer alloy than the previous lot. This too can cause over-pressure. The key to avoiding these unpredictable changes in pressure due to component inconsistencies is to buy components from reputable manufacturers and to buy a large quantity of those components from the same exact lot numbers, at one time. By doing this, you will help to eliminate variables among your available components. I buy no less than three 8lb kegs of powder at a time. This allows me to gain a great deal of predictability regarding how that powder behaves. I typically buy no less than 1000pcs of brass and 1000 bullets at a time for that same reason. Primers I will typically buy in quantities of 20,000 or more. Obviously the quantities people will buy will vary depending upon their own circumstances, but the rule is simple: The more you buy, the less testing will be required to understand how those components behave.
Modes of Component Failure
If the pressure inside a cartridge is too high for the brass or primer to withstand, those components will fail partially or completely in some manner. These failures will typically be self evident after they have occurred, the warning signs leading up to those failures may be much more subtle. We will take a look at a few different types of these complete component failures before moving on to discuss the warning signs.
Split Necks
Rather than excess pressure, split necks are most often caused by brass which has been work hardened. Brass becomes hard and brittle directly as a result of being fired and subsequently resized again. Excess pressure will certainly increase the rate at which the brass is hardened, but usually other aspects of the brass are ruined by this before the necks will split. Split necks can also be caused by an out-of-spec neck in your chamber. Annealing your cases can help significantly to avoid split necks and keep a consistent bullet release.

Case Head Separation
This is another mode of component failure which is often attributed to pressure, but is actually most frequently caused by improper headspace in your chamber or improper setup of your sizing die. Brand new and perfectly good brass can easily be ruined by pushing the shoulder down to far with a sizing die. If you set the shoulder back too far, that stress will find its way to the web of the case, just above the case head. This is the area of the case that doesn't really get resized, and is at the junction of where the case is unsupported by the chamber. This by itself can cause case head separation. The shoulder of the case corresponds to the shoulder of the chamber. If the cartridge is too short from the base to the shoulder, then the space between the chamber shoulder and the brass shoulder can be too great for the brass to flow into effectively. This will rarely be a problem as long as the base of the case is firmly against the bolt face. If the case is against the bolt face, the brass in the shoulder area will simply expand to fill the void. This may lead to split necks/shoulders, but usually will not be unsafe. If the case is not firmly against the bolt face however, then the brass will expand not only at the front, but the rear! As the case head is quite thick, and the case web is quite thin by comparison, the brass will stretch there until the case head presses against the bolt face. The rear of the case is not designed for movement, but rather to hold pressure, so it is much harder and more resistant to stretching. This will result in a case head separation as you see below. It is generally unnecessary to set your shoulders back more than .001-.002" when setting up your sizing die.

Primer Pocket Expansion
This is a symptom of either soft brass or loads which are too hot for the brass. As you may imagine, the two are not separate, but essentially go hand in hand. The brass can not be "too soft," but rather, you are simply producing too much pressure with your chosen components and powder charge. Granted there are expected operational capabilities that each cartridge is expected to perform within, and some batches of brass are simply bad and do not allow for operation within that window. These poor batches of brass can produce mildly undesirable behavior such as less than optimal velocities and brass life. Exceptionally bad batches of brass can be downright dangerous and will often refuse to operate safely with even the most mild loading. The case head is an area of the brass that we can not effectively do much with as handloaders. We cannot easily resize or manipulate this area of the case, so once it goes, the brass is ready for the trash can. Running loads with excessive pressure will greatly speed this process up. As the base of the case is not supported by the chamber, excess pressure inside the case will cause this area to expand directly proportionately with the amount of excess pressure present. If the primer pocket expands too much, it will be too large to hold a primer. Any attempt to seat a primer will result in the primer just falling back out. How soon this happens is directly related to the composition of the brass and the pressure presented to it during the firing cycle. Some shooters that have very high end match chambers which fit the brass perfectly, and an associated sizing die which does minimal work to the brass. Combined with mild loads, those shooters have been able to get in excess of 60 firing cycles on brass before it can no longer be loaded. Conversely, you can ruin the capability of brass to hold a primer with one single firing if the pressure is high enough.
I do not have an image that shows primer pocket expansion, as it isn't something you can really "see" but is more of something you can "feel." When seating primers you can feel how much force it takes to get the primer in the pocket. Pay attention to that, as when it becomes easy you must throw that brass out. Switching to a primer with a larger diameter may gain you a few more firings, though I would recommend avoiding that unless you are poverty stricken. When the brass is done, it's done.
Pierced Primers
This is basically just like it sounds. The excess pressure pierces through the primer cup, creating a hole in the bottom of the primer. Pierced primers are most often right in the impact of the firing pin as in the image below, but can be anywhere on the bottom of the primer cup. While the root cause of pierced primers is over-pressure, there can be a bit of a false positive brought on by improper firing pin to firing pin hole fitment. A bolt with excessive space between the firing pin and firing pin hole on the bolt face will allow the primer to flow into that space, weakening the integrity of the primer cup. In other instances where the primer is pierced somewhere other than the firing pin impact, it is usually simply a case of more pressure than the primer cup can tolerate. The solution here is to have a bushing installed in your bolt face to solve the firing pin issue, reduce your loads, or switch to a primer with a thicker cup.
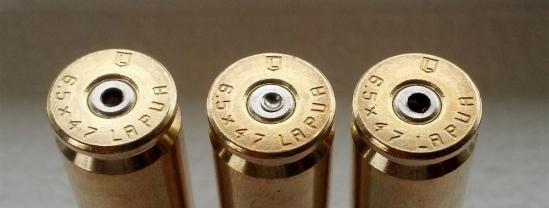
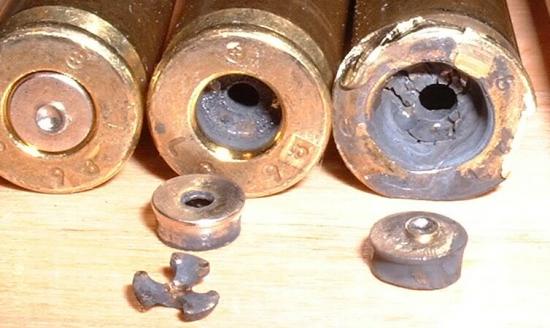
Blown Primers
This would certainly rate as one of the more severe modes of component failure. A "blown" primer essentially means that upon removing the fired cartridge, the primer falls right out of the primer pocket. If this is happening, then we can safely assume a few things. We can obviously assume that pressure is far too high for the brass. The case head has expanded greatly, leaving the primer pocket so loose that the primer falls free. We can assume that the primer cup has been deformed to the point where it can no longer stay in place, as it too has expanded rearward. In the image below you can see what usually happens in the event of a blown primer. The middle subject has a pierced primer to go along with the extremely flat and mushroomed shape of the cup. The subject on the right is so ridiculously over-pressure, I am hesitant to speculate what caused it.
Pressure-related Firearm Damage
Damage from the pressure released into the action from several of the above events can be devastating to the firearm, the shooter, or both. In the event of a pierced primer, the escaping pressure can cause severe damage to the firing pin hole in your bolt face as well as damage your ejector and extractor. In the event of a blown primer, the pressure release often goes around the entire circumference of the primer. This will leave a ring engraved in that same circular pattern on your bolt face. The pressure release can also cause a myriad of other problems on your bolt, such as ripping your extractor out, seizing your ejector, or critically engraving your bolt. If the over-pressure is bad enough, it will do all 3 in one shot! Depending upon the design of your rifle, you may also experience these hot pressurized gasses finding their way back into your face. In the case of a Remington 700 or similarly designed action, the pressure from a pierced or blown primer can go through the firing pin hole, back through the bolt, and out around the cocking piece. The space between the cocking piece and bolt shroud does not seem like much, but there can easily be a jet of hot gas and debris shooting right back at your face via that channel if you blow a primer.
In the event of a case head separation, the released pressure can result in permanent damage to the rifle's chamber. The case often separates just in front of the rear of the chamber, engraving a ring at the point where the case separated. This ring can cause each piece of brass fired from that point on to be damaged. It can also create issues trying to chamber a round. A chamber can often survive a case head separation if it is very mild. Some vigorous action with a chamber brush and cleaning solvents may completely remove the ring. In the event of case head separation, blown/pierced primers, or other unexpected pressure release, most actions have a pressure release port just behind the tenon. This is fairly important if you are firing a rifle that has your face directly behind the action due to the aforementioned reason of the pressure being able to travel through the bolt and out around the cocking piece. Other rifles are designed in such a way that pressure is naturally carried away from the shooter by other means in the event of over-pressure.
If you take the pressure too far, the firearm itself can have a complete and total failure. This is referred to as a "kaboom" or "grenading." During this kind of event, the pressure exceeds the firearm's capabilities to contain that pressure. This can come in the form of bolt lugs shearing off, the barrel tenon and action splitting/cracking, or the firearm completely exploding into pieces. Examples of this can be seen all across the internet where shooters have used the wrong powder, had an obstructed bore, or used improper ammunition in their firearms.
Types of Pressure Signs
Before moving on to the imagery, we'll list the various different types of pressure signs which you may encounter, and describe them in detail. Then after the descriptions are laid out we will show what these various signs may look like on fired cartridges.
Ejector Wipe
Ejector wipe is typically most prevalent in cartridges that have spring-loaded pin-style ejectors such as found on Remington 700 and other similar actions. As previously discussed, when you fire a cartridge, the brass expands. If the base of the cartridge is subjected to pressure beyond it's limitation, the brass will flow into any relieved areas available to it. With most firearm designs, in order for the spent casing to be ejected from the firearm, the extractor grips the case rim on the side of the ejection port and pulls it rearward. There must be a hole or slot for a spring loaded ejector, or a slot upon which a mechanical ejector hits the case on the opposite side, which tilts it out of the ejection port. Basic firearm functionality at play. Anywhere the bolt face is relieved for those devices that rests beneath the case head, provides an opportunity for brass to expand into those openings. The more pressure is applied to the brass, the more it will flow into those relieved areas. Ejector wipe occurs when pressure is such that the brass flows into the ejector relief, and does not spring back to it's original state completely. Then, due to the nature of how most non-blowback repeating firearms function, the bolt must unlock by way of rotation, and engage a cam to initiate primary extraction. During this initial bolt rotation, the case is usually stuck or stationary in the chamber, while the bolt face rotates against the case head. The relieved area of the ejector basically "shears" off the raised area of brass that previously flowed into it. This leaves a smear, of sorts, on the base of the brass. This as well as all other pressure signs will be illustrated below in detail. Beware of false positive indications of ejector wipe which can be caused by excessive spring pressure on the ejector pin, or an ejector pin which has rough or jagged geography. Removing the ejector and shortening the spring, polishing the ejector pin, or both... will typically remove this problem.
Ejector Ring
Ejector ring is basically ejector wipe, without the wipe! With ejector ring, you can see the imprint of the ejector relief in the bolt face, but the brass is not subsequently smeared upon extraction. This can be due to the case rotating with the bolt as the bolt is rotated rather than the case being stuck in place. A false positive reading of ejector ring can be caused by sharp or jagged edges on the ejector relief. Some polishing compound and or light filing can usually take care of this.
Extractor Print
Extractor print works very much the same way as ejector ring, and just as ejector ring, can have various signatures based on the design of the firearm. If the bolt face is relieved beneath the brass to allow functionality of an extractor, then brass may flow in there just as the ejector and show pressure signs similarly.
Primer Cratering
Primer cratering appears very much like it sounds; a crater on the primer. Primer cratering was touched on earlier when we discussed pierced primers. Essentially, primer craters are indicated by a raised ring around the firing pin impact. The presence of a cratered primer does not automatically mean you have excessive pressure. As described above, a poor firing pin fitment to the bolt face can cause it on its own. The tell-tale sign of a dangerous primer crater is very jagged edges on the crater rim. However, if your rifle does not crater primers on normal loads, and then begins cratering, you can be fairly certain it is being created by over-pressure.
Primer Flattening
Primer flattening is a condition where the circumference of the primer cup loses its radius on the bottom of the cup and becomes flat across the bottom to the edges of the primer pocket.
Velocity Loss
Excess pressure can be detected fairly reliably by use of a chronograph as well. If you are adding powder incrementally such as when doing an OCW load development process, yet rounds with more powder yield less velocity, this can be an indication that the brass has been pushed beyond it's limit. If it can not hold the pressure, then it will not constrict the volume adequately and will result in less pressure being exerted on the bullet. The pressure will be lost to component expansion internally. A fairly precise chronograph is required to be able to track this event, but it is noteworthy. Usually other pressure signs will be evident as well if this velocity loss is taking place, thus it is not a requirement to use a chronograph. Though it can be helpful as an indicator.
Heavy Bolt Lift
Heavy bolt lift, otherwise referred to as "sticky" bolt lift is a symptom of over-pressure cartridges. The brass cases we use in our ammunition have a certain "spring back" that happens after the firing event is over. If the brass is subjected to pressure beyond it's operational limit, it will not spring back, but rather expand to fill the chamber completely. This causes pressure against the bolt face, in essence "binding" the lugs against the receiver. This binding will resist your attempts to lift the bolt and will certainly feel different than other cartridges with normal pressure. Each specific rifle action tends to behave slightly differently when subjected to over-pressure and this is due to the wide array of action designs out there. For instance, stiller actions tend to lift somewhat smooth, but then have a pretty nasty "pop" at the very end, often requiring a solid smack on the bolt handle. More robust actions such as a Surgeon or Accuracy International will tend to be a bit more difficult to lift throughout the entire range of motion with no real hitch point. While each action will handle over-pressure with varying dominance, the cause of heavy bolt lift is going to be the same; over pressure.
Reading Pressure Signs
Now that you know what to look for, lets evaluate some fired cases to identify what these pressure signs commonly look like. I used this macro lens to take the pictures below. When reading pressure signs, a magnifying glass or this loupe with light source is an invaluable tool. It will give you a much better look at the geography on the base of the case and ensure you are reading things correctly. Using your naked eye will suffice if you have good close eyesight, but using a magnifier will help tremendously.
Example #1
Below you will see a .300 Blackout case fired from a custom rifle with a Surgeon 591 action. The benefit of magnification when reading pressure signs should be immediately apparent here. You can see everything! When considering the primer itself, you will notice that the circumference still has a nice radius and has not been flattened in any way. The firing pin impact is a dimple, with no raised ring around the circumference. Upon close inspection, you can see there is some geography on the firing pin of this Surgeon 591 action which has been imprinted on the primer. This is most likely some left over machining marks. This should not cause an issue, but could be polished out to ensure the sharp edges do not promote primer piercing.
You can also see there is some ejector wipe on this case, beginning from the second 0 on 300 and wiping clockwise. Here is where a novice will often be fooled. This ejector wipe is a false-positive which is being created by the spring-loaded ejector being sharp and/or having excess spring pressure. The easiest way to tell is by considering the direction of the wipe. In this case, it is clockwise from the largest part of the wipe to the smallest. In a right-handed action, that mark can only be created by the closing of the bolt, not opening. Consider the case in the chamber, stationary. If the bolt is rotated upward on a right handed rifle, the mark must be counter-clockwise in order for it to be caused by excess pressure. This rifle obviously needs to have the ejector serviced to remove this false positive.
Aside from that false-positive ejector wipe, this fired case is immaculate. It represents exactly what you want to see.

Example #2
Here we have a 22-250 Remington case which was fired from a factory Remington 700 rifle. You will notice some ejector wipe from the 0 on 250, counter-clockwise to the M on Rem. It is mild, and without heavy magnification it may have been missed. However it is still there. The fact it is counter-clockwise is a virtual assurance that it was created after the firing event. The way you can be absolutely sure, is to grab a loaded round and cycle it in the rifle. If it comes out with a similar mark without having been fired, then you will know the ejector plunger or spring will need work. If it does not come out with a mark, then you can be 100% sure it is being created by over-pressure. Remember what was conveyed earlier on however, in that all of these pressure signs can be caused by other conditions which are not allowing the brass to do it's job correctly. Lubrication on ammo, improper headspace, and many other things can throw you down the wrong rabbit hole. Those things can generally be avoided if proper practices are used. Aside from that minor ejector wipe, the brass is otherwise in good order.
Moving on to the primer, you will see that the circumference of the primer itself still has a nice radius, but it has been flattened slightly when you compare it to the .300BLK case above. This type of flattening is quite normal and is nothing to be concerned about. Moving to the interior of the primer you will notice a large raised ring around the firing pin impact. This is primer cratering. While it is obvious cratering, there is not much to be concerned about here either, as the raised ring is not jagged. This primer geography you see here is a signature of virtually all factory Remington 700 rifles and actions. They have a very sloppy firing pin to bolt face fitment. This can be resolved by sending your bolt out to have a bushing installed in the bolt face.

Example #3
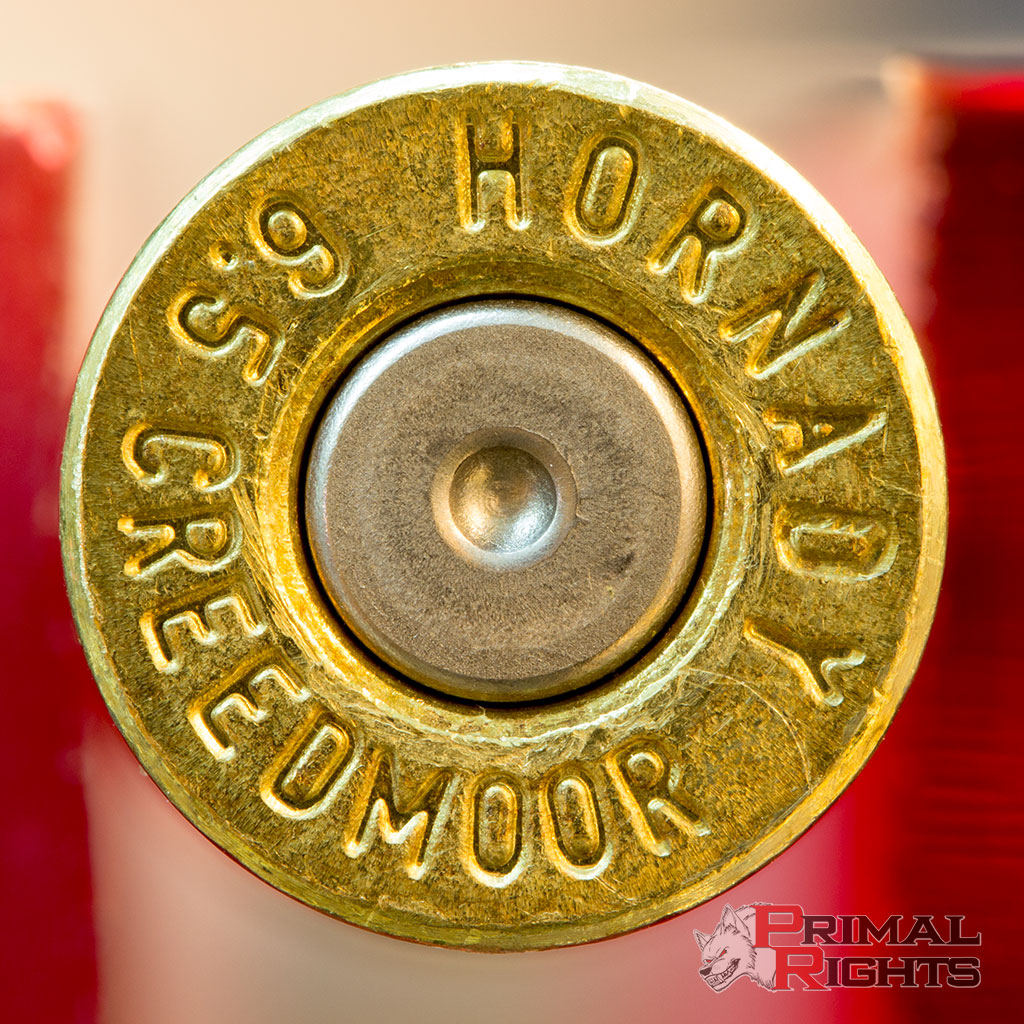
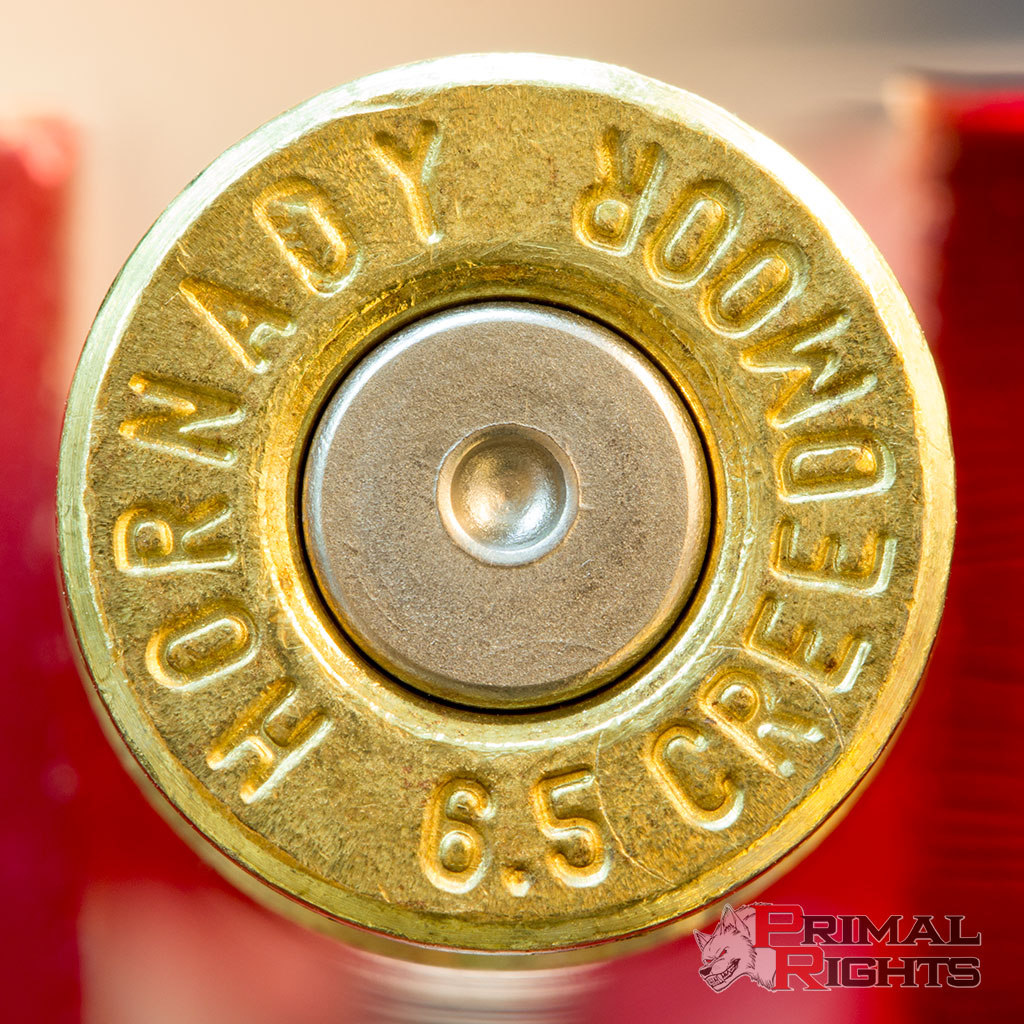
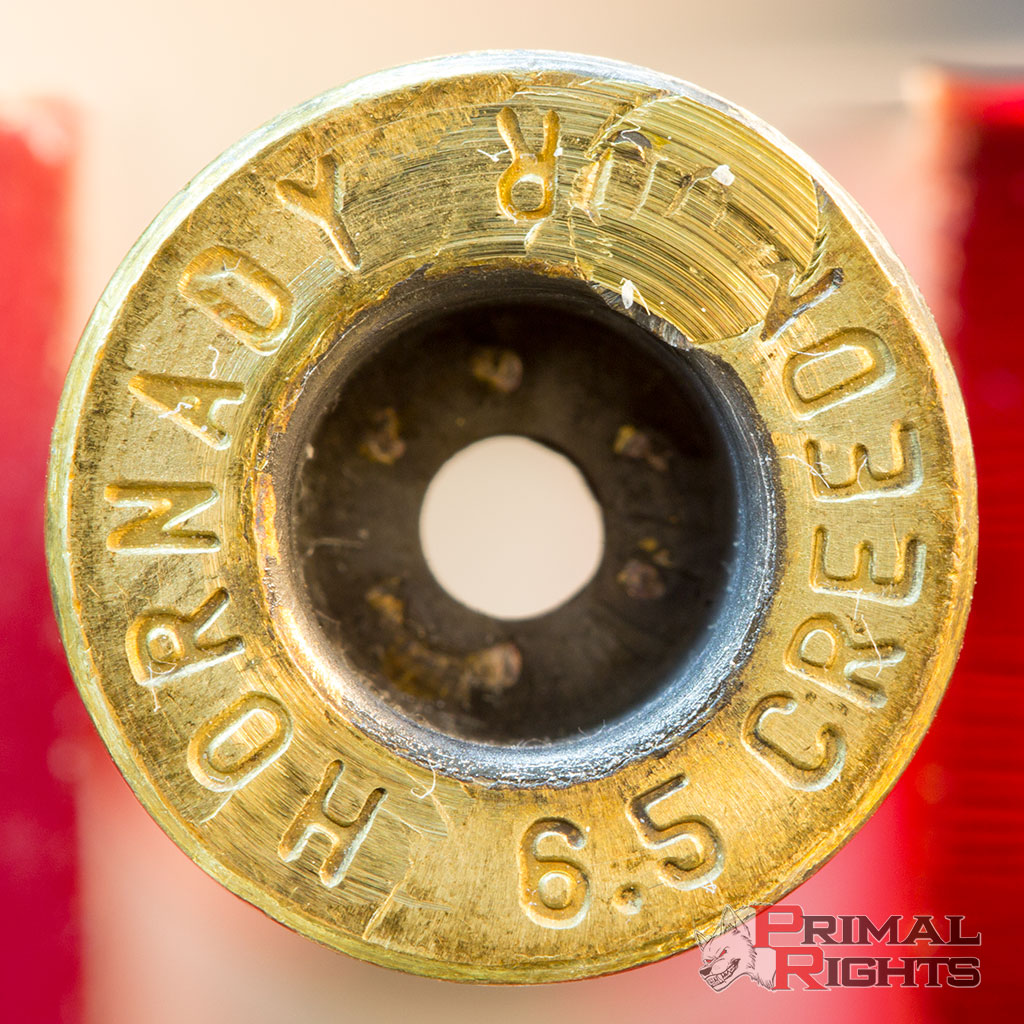
This example is going to be a series of images that show fired cases from a Desert Tech SRS-A1 with a 6.5 Creedmoor barrel. The rounds have been loaded sequentially in 1gr increments, starting at 41gr of H4350. The primers used are CCI-200, the bullets used are Berger 140gr VLD, and brand new Hornady brass. With 6.5CM, 41gr of H4350 and 140gr bullets is considered to be a relatively mild load in most rifles, so it serves as a good starting place.
41gr
Here in this first image you will notice ejector ring centered around the "R" in creedmoor. The primer has a good radius along its circumference, and while there is the tiniest of edge around the perimeter of the firing pin impact, everything looks A-OK. So this is rather odd, considering that this is no way a high-pressure load for this cartridge, yet we have a clear pressure sign. Hornady brass is notoriously soft, and can easily be blamed for this. However in this instance it is not solely at fault. Upon inspection of the DT bolt with heavy magnification, there was a very slight sharp edge around the perimeter of my ejector recess. This when combined with the softer hornady brass is a certain reason why this false-positive pressure sign was being created.
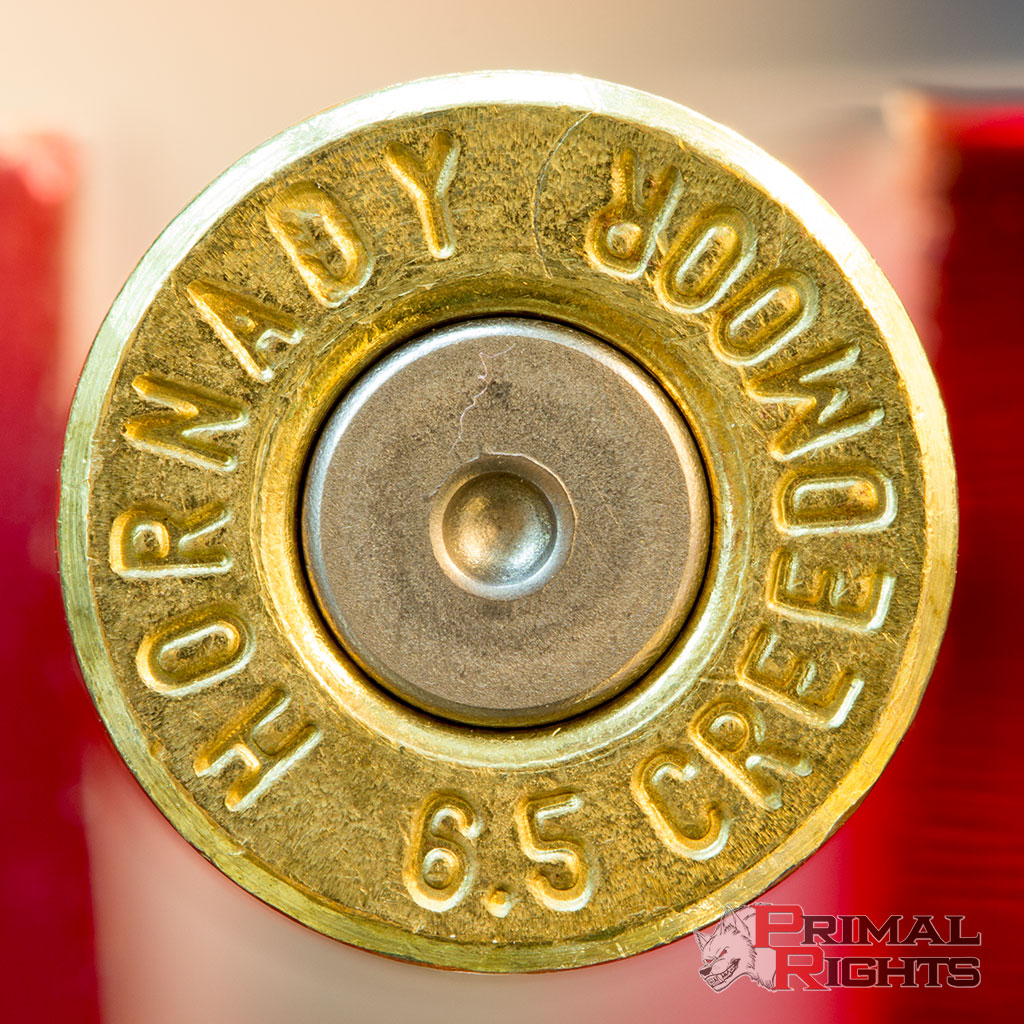
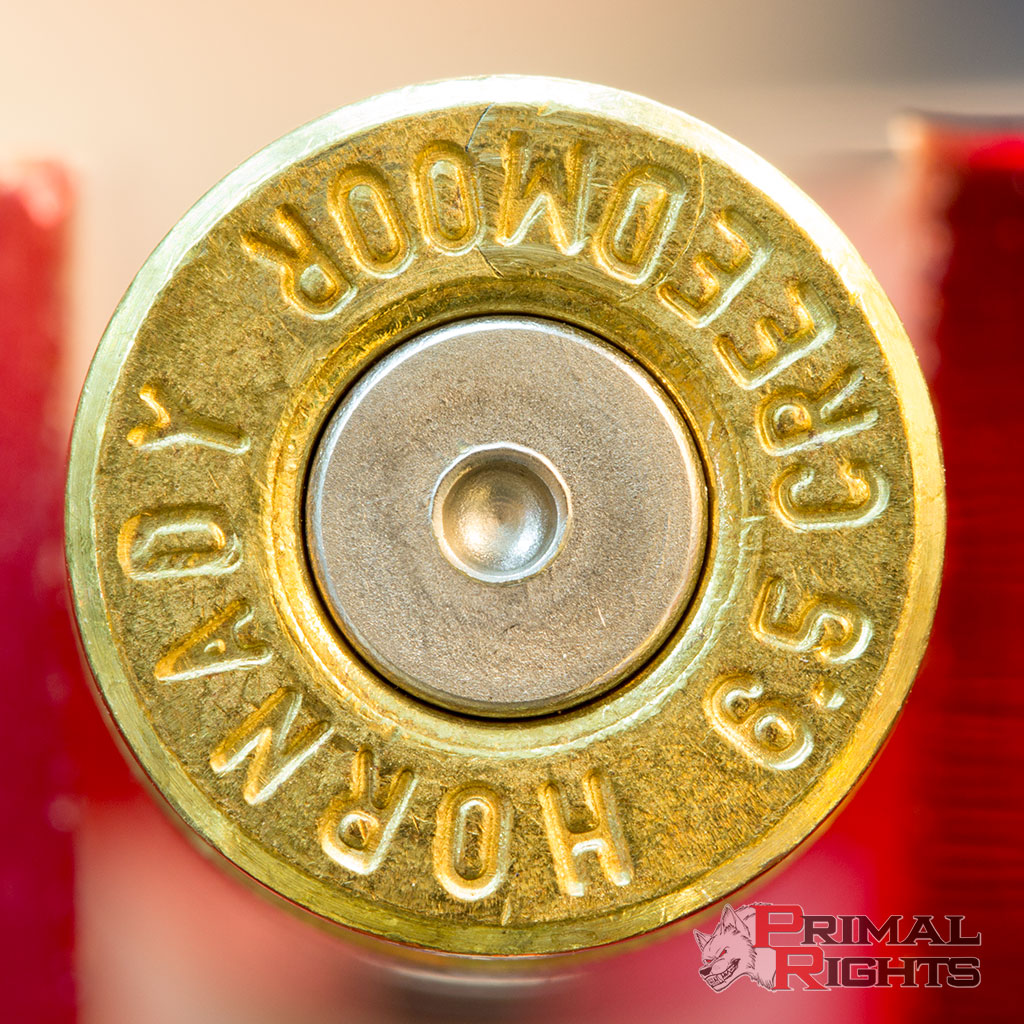
42gr
It is noteworthy that my chosen load for this rifle is 41.5gr of H4350. This sample is very much like the previous case, with things looking pretty good. The ejector ring issue has been explained so it is not of great concern. The circumference of the primer shows a little bit more flattening than the previous case, though still nothing to worry about. The primer has a tiny bit of jaggedness around the firing pin impact, but still no real concern there either.
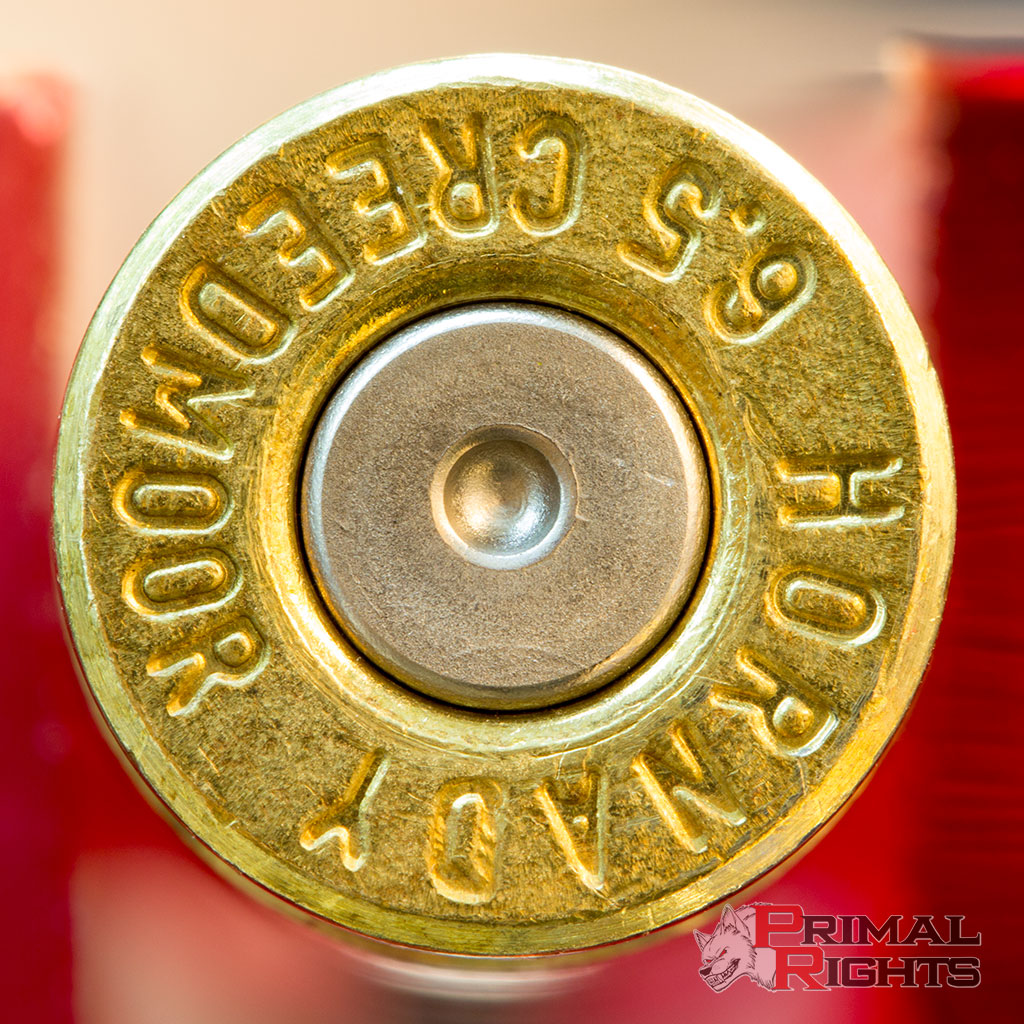
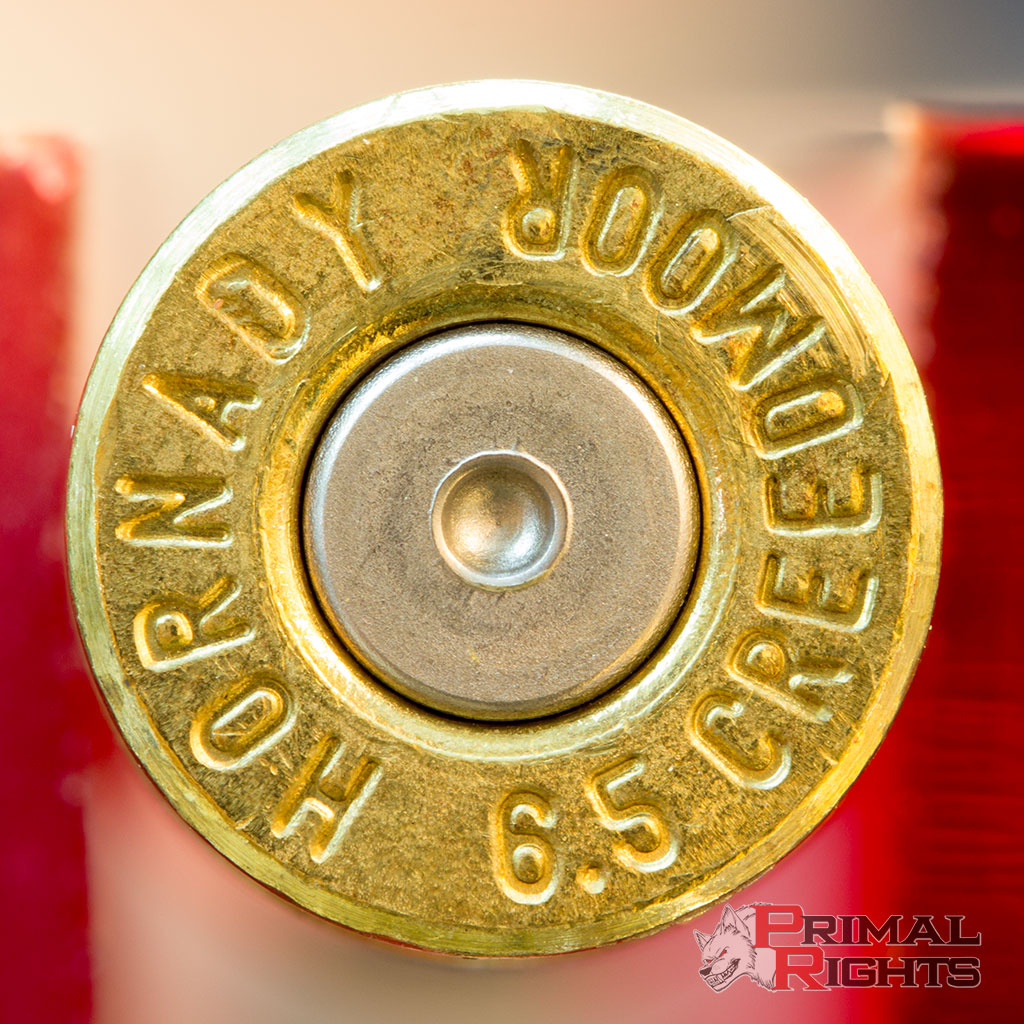
43gr
This case looks very much like the previous. Not much to say, as all looks within tolerance. There is a node right around here in this particular barrel of mine, but I've found that lower nodes tend to be much more stable and I do not like to stress my components.
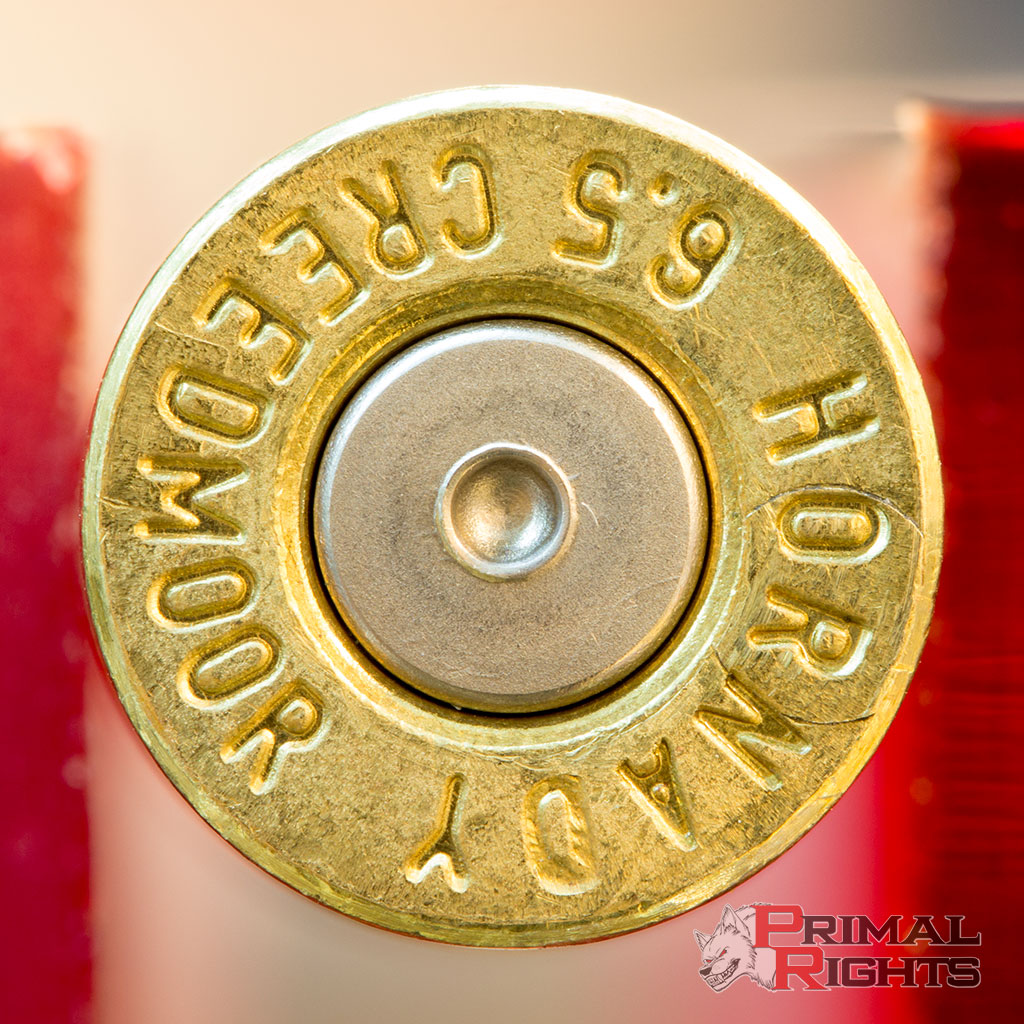
44gr
Here we are starting to see some activity. The ejector ring is much more pronounced, the circumference of the primer is starting to flatten out just a bit more, and the jaggedness around the firing pin impact is popping up a bit more. It's becoming a crater, but due to how nicely the firing pin fits in the hole on the bolt face, it's certainly a more subtle affect than on other rifles with a sloppy fitment.
45gr
Now we are starting to press into the danger zone. When considering the ejector ring is very prominent, you will now see that a clear ejector wipe is starting to present itself as well. The circumference of the primer is beginning to really flatten out and the firing pin impact has a significant crater forming. When you have a tight firing pin to hole fitment on your bolt, the formation of any crater is usually significant and should be given weight.
46gr
This image is very important to discuss. People tend to get lulled into a false sense of security if they do not have adequate experience reading pressure signs. If you were to consider this case as compared to the previous, you would probably say that it has less pressure. Obviously upon adding 1gr of powder that is most certainly not true, yet based on the visible signs it could certainly be interpreted that way. There is ejector ring and wipe on the "DM" of creedmoor, but only mildly worse than the previous case. The primer on the other hand shows virtually identical cratering, yet isn't nearly as flat around the circumference of the cup. The reason for why some pressure signs are showing less, even when they should be showing more, has to do with advanced interior ballistics and is outside the scope of this article. The short answer is that while pressure increased, the components did not react the same way. This could be due to this specific piece of brass having slightly different dimensions, or this specific primer being slightly different. Regardless of what the specific reason is, it is apparent that something was different. You can not be tricked by these eventualities and the easiest way to avoid being fooled is to use a significant sample size when testing. One single round is not enough to determine completely what is happening. The more the better, within reason.
47gr
Anyone that has loaded for 6.5CM knows that this charge weight is sheer lunacy. Yet judging by the previous couple cases, you wouldn't guess it, would you? I see people running a steady diet of ammo that produces the last couple examples as well as this one below pretty regularly... and it scares the crap out of me. It should scare them, but they probably don't have my experience and do not know what I know. Here at 47gr while there are pressure signs, they do not look life threatening. They absolutely can be, but many people wouldn't guess it by looking at it. Ejector ring, ejector wipe, primer cratering, but only mild primer flattening. Did you happen to notice the extractor print that showed up? Take a look at the area by "DM" on creedmoor. It's plainly there, but without the aid of magnification and a bit of experience looking for these things... folks can easily miss it. Always give a glance opposite of the ejector and study that area closely. Make no mistake about it, if you are seeing all of these pressure signs on fired brass, you are so far beyond safe levels that it's not even remotely funny.
48gr
Here we are at total failure. Would you have guessed to see this after the last example? It was a pretty smooth looking road up to this point wasn't it? This should be a learning moment for you. The warning signs of pressure can be extremely subtle... right up until they aren't. When it goes bad, it goes terribly bad and extremely unpredictably. This is why it is so important for you to know what you are doing around firearms, rather than just thinking you know.
Here we see all pressure signs taken to the extreme. Ejector ring and ejector wipe essentially smeared off the headstamp lettering. The primer pocket expanded so much that it was unable to retain the primer, and the primer was lost upon ejection of the case. Bolt lift was very difficult. The extractor print was extreme and even produced extractor wipe. There is essentially a "smear" around the entire circumference of the brass, as it was pressed into the bolt face extremely hard.
Reading pressure signs is part science, part experience, and part instinct.
Now that you have some great examples to refer to regarding what each pressure sign may look like, the next step is being able to apply that to what you see on your own fired cases. They will often not look like the examples posted above. There is a great deal of variation in the order of appearance and the severity that each sign may present. A case that exhibits flat and cratered primers, but no other signs at all, may not be dangerous. It could simply be primers with a thin cup that need to be replaced with primers that have a thicker cup. These inconsistent pressure sign appearances are due largely to the variations in reloading components as well as specific pressure curves that certain component combinations create in specific cartridges.
While this is far outside the scope of this article, it should be known that the pressure curve created when a cartridge is fired is more important than the powder burn rate itself. The powder burn rate, while being the metric which is most available to us when selecting a powder, can be quite misleading. The "burn rate" if there is such a thing, does not account for the configuration of the powder column, nor the bore diameter, projectile bearing surface, projectile diameter, bullet release force, chamber lead angle, or any of the other variables that come into play when considering interior ballistics. The "pressure curve" is commonly used to describe the actual behavior of the firing event in specific cartridges. This is evident as to why certain powders work extremely well in some cartridges, but very poorly in other cartridges of near equal volume. As it pertains to this article, these specific pressure curves that coincide with very specific component combinations in specific cartridges can produce wildly different pressure curves if even one component is changed. The important thing is to recognize the pressure signs when they appear, and competently be able to explain them. ... and I do mean explain, not make excuses for. Simply saying "well I've fired thousands of rounds like that" is not adequate nor acceptable as an explanation. Identifying the pressure signs, making an educated analysis of those signs, and then identifying the root cause of them so that it can be addressed is the mark of a responsible shooter.
There is no situation where it is acceptable to be running ammunition which produces legitimate and dangerous pressure signs in your firearm. This is not open for debate. If you are willing to accept the risk, and NEVER shoot around any other people, that is on you. However, if you shoot around others, then you have absolutely no freedom to endanger them simply because you think max velocity is the key to all your marksmanship dreams. It is not, and you do not. Period.
I absolutely hated pushing a rifle so far as to cause the pressure seen in the images above. However, in order to illustrate what can happen and how quickly it can happen, I believed it very necessary. I speak to customers from all over the country on a daily basis and all over the world on at least a weekly basis. They call looking for advice because they know I will only speak from experience. One common theme that I encounter on these conversations is a complete lack of understanding of pressure and how it can affect them. There is an air of complacency combined with an attitude of infinite trust in reloading component and rifle manufacturers which I can only describe as gullibility or benign negligence on behalf of many shooters. I sincerely hope this article will serve as not only a great informational source, but a wake-up call to those complacent shooters.
I thank you for visiting to read this article, and if you have any questions about this or my other work, or if you would like to post pictures of your own cases for evaluation, you may reach me on the forums at www.gunhive.com
Most Recent Posts
Primal Rights, Inc
18570 Chance Rd
Meadow SD 57644
© Copyright 2009-present Primal Rights Inc
ALL RIGHTS RESERVED
No part of this website or any of its content may be reproduced, distributed, or transmitted in any form or by any means without the express prior written permission of Primal Rights, Inc